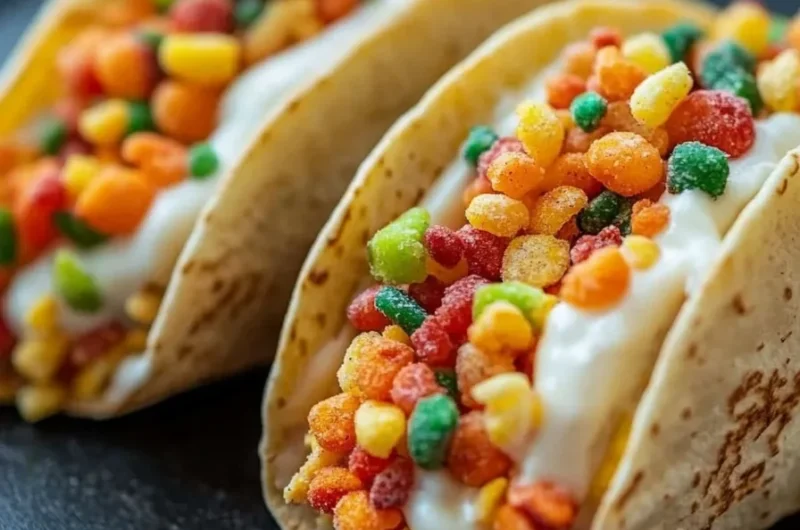
Fruity Pebbles Cheesecake Tacos is an amazing treat that combines the best of both worlds: the creamy, rich texture of cheesecake and the fun, colorful appeal of your favorite childhood cereal. This dessert is a whimsical and delicious alternative to traditional tacos. Each bite offers an explosion of fruity flavors wrapped in a crispy shell, making it a standout choice for parties, potlucks, or just a fun family treat.
Imagine biting into a crispy taco shell filled with a luscious cake-like cheesecake filling, all topped with the vibrant colors of Fruity Pebbles. These delightful tacos are perfect for gatherings, birthday parties, or simply when you feel like indulging in something sweet. This guide breaks down everything you need to know about crafting these delightful treats, from their irresistible flavor combinations to straightforward preparation steps.
The combination of cream cheese, whipped cream, and Fruity Pebbles creates a delightful flavor profile that is both nostalgic and exciting. Not only will these Fruity Pebbles Cheesecake Tacos tantalize your taste buds, but they will also be a hit with kids and adults alike. Let’s dive into why you’ll love this recipe and how you can create these spectacular sweet tacos in your own kitchen.
Why You’ll Love This Recipe
Fruity Pebbles Cheesecake Tacos is more than just a fun dessert; it’s an experience that captures the essence of joy and creative cooking. Here are some compelling reasons why you’ll fall in love with this recipe:
1. Unique Flavor: The sweet, tangy cheesecake combined with the fruity cereal creates a wonderful flavor contrast that’s sure to impress.
2. Visual Appeal: The vibrant colors of Fruity Pebbles make these tacos a feast for the eyes, elevating your dessert game.
3. Easy to Prepare: With simple ingredients and straightforward instructions, even novice bakers can whip these up with ease.
4. Perfect for Any Occasion: Whether it’s a birthday party or a casual get-together, these tacos make a delightful centerpiece.
5. Versatile Recipe: Feel free to modify the filling or toppings for different flavor experiences, like adding chocolate chips or fresh fruits.
6. Family-Friendly Activity: Making these tacos can be a fun group activity, allowing everyone to pitch in and decorate their creations.
When you understand the fantastic aspects of making Fruity Pebbles Cheesecake Tacos, you’ll be inspired to head to the kitchen and start mixing!
Preparation and Cooking Time
Creating Fruity Pebbles Cheesecake Tacos is a straightforward process that won’t take much time. Here’s a breakdown of the time required to make this delightful treat:
– Preparation Time: 30 minutes
– Cooling Time: 2 hours (to allow filling to set)
– Total Time: Approximately 2 hours and 30 minutes
These times might vary based on your skill level and kitchen efficiency, but this estimate should give you a solid idea of the timeline.
Ingredients
– 1 package taco-shaped cookie shells (store-bought or homemade)
– 2 cups cream cheese, softened
– 1 cup granulated sugar
– 1 cup whipped cream (or Cool Whip)
– 1 teaspoon vanilla extract
– 1 ½ cups Fruity Pebbles cereal (divided)
– Optional toppings: additional Fruity Pebbles, whipped cream, chocolate sauce, or fresh fruit
Step-by-Step Instructions
Creating these delectable Fruity Pebbles Cheesecake Tacos is easier than you might think! Just follow these simple steps:
1. Prepare the Taco Shells: If you’re using homemade taco shells, bake them according to your recipe’s instructions and let them cool.
2. Mix Filling: In a large mixing bowl, beat the softened cream cheese and granulated sugar together until smooth and creamy.
3. Add Vanilla: Stir in the vanilla extract until fully incorporated.
4. Incorporate Whipped Cream: Gently fold in the whipped cream until the mixture is light and fluffy. Be careful not to overmix.
5. Add Fruity Pebbles: Fold in 1 cup of Fruity Pebbles, reserving the remaining for garnishing.
6. Fill Shells: Using a piping bag or spoon, fill each taco shell with the cheesecake mixture.
7. Chill: Place the filled tacos in the refrigerator for at least 2 hours to set properly.
8. Garnish: Just before serving, sprinkle the reserved Fruity Pebbles on top of each taco. Add additional whipped cream or any other desired toppings.
9. Serve: Enjoy your Fruity Pebbles Cheesecake Tacos right away for the best texture.
How to Serve
Presenting your Fruity Pebbles Cheesecake Tacos can be as creative as making them. Here are some serving suggestions that will wow your guests:
1. Colorful Platter: Arrange the tacos on a fun, colorful serving platter to enhance their visual appeal.
2. Scoop of Ice Cream: Pair them with a scoop of vanilla or fruity ice cream for an added indulgence.
3. Fresh Garnishes: Consider adding fresh fruit slices, like strawberries or bananas, around the platter for an extra touch of elegance.
4. Themed Parties: They are perfect for themed parties. Create a colorful carnival setup with vibrant tableware and decorations.
5. Interactive Dessert Bar: Set up a DIY taco station where guests can make their own with various toppings like chocolate drizzle, sprinkles, or different cereals.
With these creative serving ideas, your Fruity Pebbles Cheesecake Tacos are sure to be the highlight of any gathering!
Additional Tips
– Use Fresh Ingredients: Incorporating fresh cream and well-preserved Fruity Pebbles will enhance the dish’s flavor and texture.
– Experiment with Flavors: Don’t hesitate to try different flavors of whipped cream or cheesecake for a unique twist.
– Garnish Creatively: Additional decorations such as edible glitter or colored sprinkles can make your tacos even more inviting.
Recipe Variation
Feel free to let your creativity shine by experimenting with different variations of Fruity Pebbles Cheesecake Tacos. Here are a few ideas:
1. Chocolate Lovers: Mix in mini chocolate chips into the cheesecake filling for a rich chocolate flavor that pairs excellently with the fruity cereal.
2. Fruit Medley: Add layers of fresh fruit, such as diced strawberries or blueberries, between the cheesecake and taco shell for a refreshing burst of flavor.
3. Tropical Bliss: Incorporate coconut cream into the cheesecake mixture and top with toasted coconut flakes for a tropical twist.
Freezing and Storage
– Storage: Store the filled tacos in an airtight container in the refrigerator. They are best enjoyed within 2-3 days for optimal freshness.
– Freezing: If you want to prepare them ahead of time, the taco shells can be frozen separately. However, it is best to fill them just before serving to maintain their texture and taste. Filled tacos can be frozen for up to one month; just be aware that the toppings may not retain their crispness.
Special Equipment
To make these Fruity Pebbles Cheesecake Tacos, you will need a few kitchen tools:
– Mixing Bowls: For combining the filling ingredients.
– Electric Mixer: To ensure the filling is smooth and creamy without lumps.
– Piping Bag: Optional, but helpful for filling the taco shells neatly.
– Refrigerator: Essential for chilling the filled tacos and allowing the cheesecake to set properly.
Frequently Asked Questions
Can I make this recipe gluten-free?
Yes! Use gluten-free taco shells and check that all other ingredients are gluten-free as well.
How do I know when the mixture is ready?
The filling should be smooth and fluffy, with no lumps from the cream cheese. Ensure it’s well combined.
Can I use homemade taco shells?
Absolutely! Homemade taco shells can add a personal touch. Just be sure they are completely cooled before filling them.
What is the best way to transport these tacos?
If you’re taking them to a gathering, transport them in a flat container to prevent them from tipping over and getting messy.
Can I add more cereal as a topping?
Definitely! Adding more Fruity Pebbles on top just before serving enhances the color and crunchy texture.
Conclusion
Fruity Pebbles Cheesecake Tacos are not only stunning to look at but also deliciously satisfying to eat. With the perfect balance of creamy cheesecake filling and crispy taco shells, they make for a fun and unique dessert that appeals to all ages. The versatility of this recipe allows you to customize it to your taste, making it a delightful addition to any occasion. Whether you’re celebrating a special event or just satisfying a sweet tooth, these delightful tacos are sure to be a hit!
Fruity Pebbles Cheesecake Tacos: An Incredible Recipe You Need to Try

- Prep Time: 15 minutes
- Cook Time: 0 minutes
- Total Time: 15 minutes
Ingredients
– 1 package taco-shaped cookie shells (store-bought or homemade)
– 2 cups cream cheese, softened
– 1 cup granulated sugar
– 1 cup whipped cream (or Cool Whip)
– 1 teaspoon vanilla extract
– 1 ½ cups Fruity Pebbles cereal (divided)
– Optional toppings: additional Fruity Pebbles, whipped cream, chocolate sauce, or fresh fruit
Instructions
Creating these delectable Fruity Pebbles Cheesecake Tacos is easier than you might think! Just follow these simple steps:
1. Prepare the Taco Shells: If you’re using homemade taco shells, bake them according to your recipe’s instructions and let them cool.
2. Mix Filling: In a large mixing bowl, beat the softened cream cheese and granulated sugar together until smooth and creamy.
3. Add Vanilla: Stir in the vanilla extract until fully incorporated.
4. Incorporate Whipped Cream: Gently fold in the whipped cream until the mixture is light and fluffy. Be careful not to overmix.
5. Add Fruity Pebbles: Fold in 1 cup of Fruity Pebbles, reserving the remaining for garnishing.
6. Fill Shells: Using a piping bag or spoon, fill each taco shell with the cheesecake mixture.
7. Chill: Place the filled tacos in the refrigerator for at least 2 hours to set properly.
8. Garnish: Just before serving, sprinkle the reserved Fruity Pebbles on top of each taco. Add additional whipped cream or any other desired toppings.
9. Serve: Enjoy your Fruity Pebbles Cheesecake Tacos right away for the best texture.
Nutrition
- Serving Size: 12 tacos
- Calories: 220 kcal
- Fat: 12g
- Protein: 2g