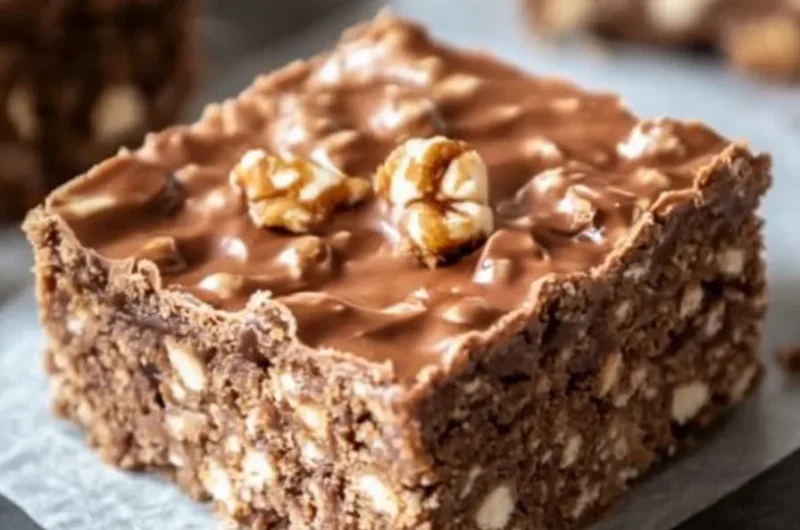
Crunch Bars are a delightful treat that combines the perfect harmony of sweetness and texture. These bars, known for their crispy rice and chocolate layers, create a mouthwatering experience. They are perfect for any occasion, whether it’s a family gathering, a movie night, or just a simple craving. This recipe not only satisfies your sweet tooth but also allows you to indulge in a fun, hands-on cooking activity.
Picture this: a bite-sized treat that melts in your mouth, showcasing layers of deliciousness. Whether you are a seasoned chef or a beginner in the kitchen, Crunch Bars are among the easiest and most delightful recipes to whip up. Just gather a few key ingredients, and you’ll be ready to create these wonderful bars that are sure to impress everyone around you!
If you love the combination of chocolate and crunch, this recipe is for you! Once you experience the joy of making and sharing Crunch Bars, you’ll be hooked. In this guide, we’ll delve into the reasons why this recipe stands out, provide you with preparation and cooking times, list the ingredients you need, and give you step-by-step instructions to make these incredible bars.
Let’s jump into what makes Crunch Bars an all-time favorite dessert!
Why You’ll Love This Recipe
Crunch Bars bring together an irresistible combination of flavors and textures that appeal to both kids and adults. Here’s why this recipe is sure to become a staple in your home:
1. Easy to Make: With straightforward steps, even novice cooks can create these bars without hassle.
2. No Bake Recipe: These bars require minimal cooking time, allowing for quick assembly and easy clean-up.
3. Customizable: You can easily switch up ingredients based on your preferences. Want to add nuts or dried fruits? Go ahead!
4. Great for Parties: Crunch Bars make for perfect party treats, and they’re easy to cut into bite-sized pieces for sharing.
5. Satisfies Cravings: The combination of chocolate and crisped rice tackles any sweet craving head-on.
6. Fun for Kids: Involve your little ones in the kitchen as they love making these crispy, chocolatey treats!
7. Storable: Once made, these bars can be kept for days, making them an excellent snack option for busy days.
With all these fantastic benefits, it’s no wonder that Crunch Bars have become a favorite among dessert lovers.
Preparation and Cooking Time
Making Crunch Bars is not only enjoyable but also efficient. Here’s a breakdown of the time you’ll need to bring this delightful treat to life:
– Preparation Time: 15 minutes
– Cooking Time: 5 minutes
– Chilling Time: 30 minutes
– Total Time: Approximately 50 minutes
This quick timeline allows you to enjoy the process and indulge in your homemade Crunch Bars in no time!
Ingredients
– 4 cups crispy rice cereal
– 1 cup semi-sweet chocolate chips
– ½ cup butterscotch chips
– ½ cup creamy peanut butter
– ¼ cup unsalted butter
– 1 teaspoon vanilla extract
– ¼ teaspoon salt
Step-by-Step Instructions
Creating Crunch Bars is a fun and rewarding process. Follow these simple steps:
1. Prepare Your Pan: Line a 9×13-inch baking dish with parchment paper, leaving some overhang for easy removal later. This will also help prevent sticking.
2. Melt the Butter: In a medium saucepan, melt the unsalted butter over low heat.
3. Add Peanut Butter and Chips: Once the butter is melted, stir in the peanut butter, semi-sweet chocolate chips, and butterscotch chips. Mix until the mixture is smooth and well combined.
4. Add Vanilla and Salt: Remove the saucepan from heat and stir in the vanilla extract and salt.
5. Combine with Cereal: In a large mixing bowl, pour the crispy rice cereal. Gradually add the melted chocolate mixture, folding gently until all the cereal is coated.
6. Transfer to Baking Dish: Pour the mixture into the prepared baking dish. Use a spatula or your hands to spread and press it down evenly into the pan.
7. Chill: Place the pan in the refrigerator for about 30 minutes, or until the mixture is set.
8. Cut into Bars: Once set, lift the bars out of the baking dish using the overhanging parchment paper. Cut them into squares or rectangles as desired.
9. Store: Keep the Crunch Bars in an airtight container at room temperature or in the fridge. Enjoy them within a week for the best flavor!
How to Serve
Serving Crunch Bars can be a delightful experience! Here are some tips to make your servings special:
1. Presentation: Arrange the bars on a nice platter. You can sprinkle some extra crispy rice cereal or chocolate shavings on top for an appealing look.
2. Accompaniments: Pair the bars with a warm drink like hot chocolate or milk for a delightful combination of flavors.
3. Fun Wrapping: Wrap individual bars in decorative cellophane or parchment paper for snacks on-the-go or school lunches.
4. Ice Cream Topping: Crumble bars over ice cream to add an incredible crunch and flavor to your dessert!
5. Gifting: Consider gifting Crunch Bars in a pretty box or tin for holidays and special occasions; they make for a thoughtful homemade treat.
By following these serving suggestions, you can enhance the enjoyment of these amazing Crunch Bars! Whether you’re indulging solo or sharing with friends and family, this recipe is sure to impress. The next time you have a craving for something sweet, these Crunch Bars are a fantastic choice!
Additional Tips
– Use Good Quality Chocolate: The taste of your Crunch Bars can greatly improve by using high-quality chocolate chips. This can elevate the overall flavor and richness of your bars.
– Mix Ins: Feel free to customize your Crunch Bars with mix-ins like crushed pretzels, puffed corn, or caramel pieces for added flavor and texture.
– Pat Down Firmly: When spreading the mixture into the baking dish, press it down firmly to ensure the bars hold their shape once set.
– Let Them Cool Completely: Allow the Crunch Bars to chill fully in the refrigerator. This step is crucial for a clean slice and a satisfying crunch.
– Try Different Nut Butters: Substitute peanut butter with almond or cashew butter to experiment with different flavors.
Recipe Variation
Make these Crunch Bars your own with the following variations:
1. S’mores Crunch Bars: Mix in mini marshmallows and crushed graham crackers for a fun s’mores version.
2. Caramel Crunch Bars: Drizzle caramel sauce on top or mix in caramel bits for an extra layer of sweetness.
3. Nutty Crunch Bars: Add chopped nuts like almonds or walnuts to enhance the nutritional value and give extra crunch.
Freezing and Storage
– Storage: Keep your Crunch Bars in an airtight container at room temperature to maintain freshness for up to 1 week.
– Freezing: For longer storage, wrap the bars in plastic wrap and place them in a freezer bag. They can be frozen for up to 3 months. Thaw them at room temperature before serving.
Special Equipment
To make your Crunch Bars, you’ll need some basic kitchen tools:
– 9×13-inch Baking Dish: This is essential for shaping your bars.
– Medium Saucepan: For melting the chocolate and peanut butter mixture.
– Mixing Bowls: You’ll use these for combining ingredients.
– Spatula or Wooden Spoon: Useful for mixing and spreading the mixture evenly in the baking dish.
Frequently Asked Questions
Can I substitute the cereal?
Yes! Feel free to use another type of puffed cereal or even granola for a different texture.
What if I don’t have butterscotch chips?
You can omit butterscotch chips or replace them with additional chocolate chips or white chocolate chips.
How do I know when they’ve set properly?
The Crunch Bars should feel firm and hold their shape when you gently press them after chilling. If they are still soft, chill them for longer.
Can I use dark chocolate instead of semi-sweet?
Absolutely! Dark chocolate will give your Crunch Bars a richer flavor.
Are these bars gluten-free?
Yes, if you use gluten-free rice cereal, your Crunch Bars will be gluten-free!
Conclusion
Crunch Bars are more than just a delightful dessert; they are a versatile and fun treat that everyone can enjoy. With their easy preparation and customizable options, these bars cater to various tastes and preferences. Whether for a party, a family gathering, or just a late-night snack, you can’t go wrong with Crunch Bars. So gather your ingredients and get ready to enjoy a sweet moment of joy with every crispy bite!
Crunch Bars: An Incredible Ultimate Recipe with 7 Amazing Tips
- Prep Time: 15 minutes
- Cook Time: 5 minutes
- Total Time: 20 minutes
Ingredients
– 4 cups crispy rice cereal
– 1 cup semi-sweet chocolate chips
– ½ cup butterscotch chips
– ½ cup creamy peanut butter
– ¼ cup unsalted butter
– 1 teaspoon vanilla extract
– ¼ teaspoon salt
Instructions
Creating Crunch Bars is a fun and rewarding process. Follow these simple steps:
1. Prepare Your Pan: Line a 9×13-inch baking dish with parchment paper, leaving some overhang for easy removal later. This will also help prevent sticking.
2. Melt the Butter: In a medium saucepan, melt the unsalted butter over low heat.
3. Add Peanut Butter and Chips: Once the butter is melted, stir in the peanut butter, semi-sweet chocolate chips, and butterscotch chips. Mix until the mixture is smooth and well combined.
4. Add Vanilla and Salt: Remove the saucepan from heat and stir in the vanilla extract and salt.
5. Combine with Cereal: In a large mixing bowl, pour the crispy rice cereal. Gradually add the melted chocolate mixture, folding gently until all the cereal is coated.
6. Transfer to Baking Dish: Pour the mixture into the prepared baking dish. Use a spatula or your hands to spread and press it down evenly into the pan.
7. Chill: Place the pan in the refrigerator for about 30 minutes, or until the mixture is set.
8. Cut into Bars: Once set, lift the bars out of the baking dish using the overhanging parchment paper. Cut them into squares or rectangles as desired.
9. Store: Keep the Crunch Bars in an airtight container at room temperature or in the fridge. Enjoy them within a week for the best flavor!
Nutrition
- Serving Size: 12 bars
- Calories: 180 kcal
- Fat: 8g
- Protein: 3g